What is Liquid Sealant Nail and How to Use It Effectively in Your Projects
In the realm of construction and DIY projects, achieving a durable and waterproof seal is paramount. This is where the Liquid Sealant Nail comes into play. A modern innovation in adhesive technology, Liquid Sealant Nails offer a unique solution to binding and sealing materials effectively, ensuring longevity and reliability in various applications. Whether you're working on roofing, plumbing, or general repairs, understanding the properties and uses of Liquid Sealant Nails can significantly enhance the efficacy of your projects.
The versatility of Liquid Sealant Nails is noteworthy; they can be used on a variety of surfaces, including wood, metal, and plastic, making them an essential tool in any toolkit. Unlike traditional fasteners, these sealants not only provide strong adhesion but also protect against elements like water and humidity. In this guide, we will delve into the practical aspects of Liquid Sealant Nails, exploring how to use them effectively to achieve a robust and professional finish in your construction endeavors. By mastering the application techniques and specific use cases, you can unlock the full potential of this innovative solution, elevating your projects to new standards of quality and performance.
What is Liquid Sealant Nail?
Liquid sealant nails represent an innovative solution in construction and home improvement, designed to provide both fastening and sealing capabilities. Unlike traditional nails, liquid sealant nails incorporate a specially formulated adhesive that activates upon application, bonding materials securely while also filling gaps and preventing moisture intrusion. This dual functionality makes them ideal for various projects, including roofing, siding, and woodworking, where maintaining integrity against environmental factors is essential.
According to industry reports, liquid sealant nails can enhance project efficiency by up to 30%, reducing the time spent on sealing and fastener installation. Their ease of use makes them particularly popular in both professional and DIY settings. The sealant's unique properties not only ensure a strong hold but also offer longevity, often outperforming conventional fasteners in terms of resistance to weather elements, which is critical for outdoor applications. The integration of liquid sealant technology simplifies the building process, allowing for quicker turnover and a more streamlined workflow across various construction projects.
Benefits of Using Liquid Sealant Nail in Projects
Liquid sealant nails have gained popularity in various construction and DIY projects due to their numerous benefits. One of the primary advantages of using liquid sealant nails is their exceptional flexibility. Unlike traditional nails, which can crack or break under stress, liquid sealant nails provide a more adaptable solution that can withstand the expansion and contraction of materials. This functionality is particularly important in environments where temperature fluctuations are common, ensuring long-lasting durability in installations.
Another significant benefit is their ease of application. Liquid sealant nails often come with a user-friendly design that allows for quick and efficient use, reducing the time needed for project completion. They can bond well to a variety of surfaces, including wood, metal, and plastic, generating a strong hold with minimal effort. This versatility makes them an excellent choice for both professional contractors and DIY enthusiasts alike. Moreover, the waterproof nature of many liquid sealant nails also adds to their reliability in areas exposed to moisture, preventing potential leaks or detachments over time, which is crucial for maintaining the integrity of the project.
What is Liquid Sealant Nail and How to Use It Effectively in Your Projects
| Feature |
Details |
| Type |
Liquid Sealant Nail |
| Composition |
Acrylic-based formula |
| Drying Time |
Typically 24 hours for full cure |
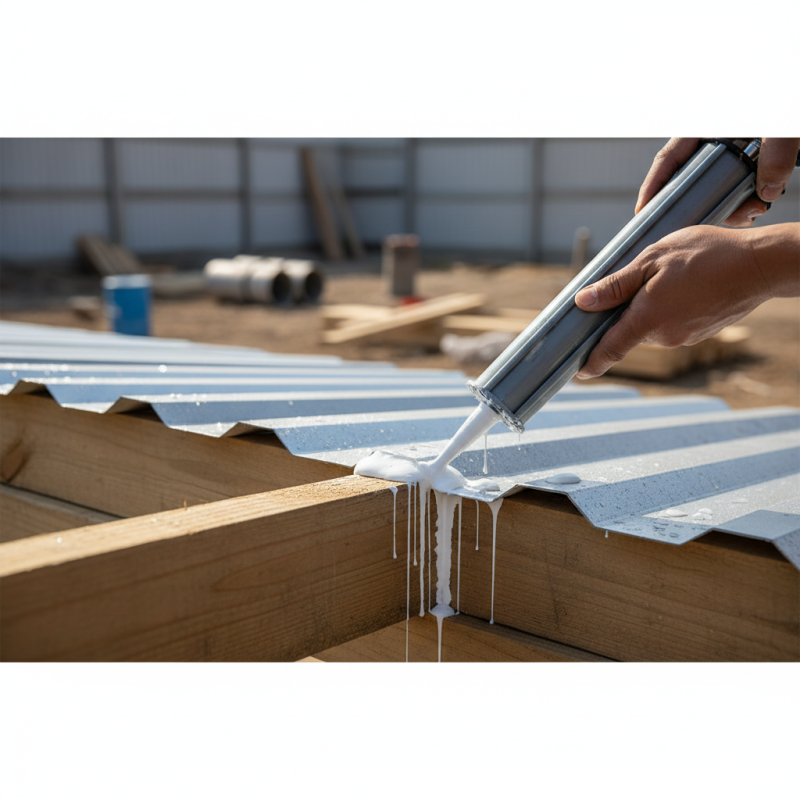
| Application Method |
Apply with a caulking gun |
| Uses |
Sealing gaps, waterproofing, and bonding |
| Advantages |
Flexibility, paintable, and easy cleanup |
| Surface Compatibility |
Wood, metal, masonry, and plastic |
| Safety Precautions |
Use in well-ventilated areas; wear gloves |
Step-by-Step Guide to Applying Liquid Sealant Nail
Liquid sealant nails have become increasingly popular in construction and DIY projects due to their ability to offer a strong bond while providing flexibility for various materials. To apply liquid sealant nails effectively, one must follow a systematic approach that ensures durability and performance.
Begin by preparing the surfaces you intend to bond. Make sure they are clean, dry, and free of dust or oil, as this helps in achieving optimal adhesion. According to a 2021 report by the Adhesive and Sealant Council, proper surface preparation can increase bond strength by up to 30%. After preparing the surfaces, apply the liquid sealant nail to one of the surfaces. A continuous bead should be applied for best results, and it’s important to work within the product's open time to ensure the bond forms adequately.
Once the sealant is applied, press the two surfaces together firmly. It is recommended to use clamps or weights if necessary to maintain pressure while the adhesive cures. Depending on environmental conditions and the specific product, total curing time may vary from 24 to 72 hours. Research indicates that environmental factors such as humidity and temperature can affect the curing process, so it's advisable to monitor these conditions for a successful application. Proper technique not only enhances durability but can also lead to significant cost savings by reducing the need for repairs in the long run.
Usage of Liquid Sealant Nail in Different Projects
Tips for Ensuring Effective Bonding with Liquid Sealant Nail
When working with liquid sealant nails, ensuring effective bonding is crucial for the success of your projects.
First, preparation is key. Clean the surfaces you intend to bond thoroughly; remove any dirt, dust, or grease that may inhibit adhesion.
For porous materials, consider using a primer to enhance bonding strength.
Additionally, applying the liquid sealant nail in optimal conditions—preferably at room temperature and low humidity—can significantly improve its performance.
Another essential tip is to apply the liquid sealant nail in a consistent and controlled manner.
Use a steady hand to guide the nozzle, ensuring a continuous bead without gaps.
For vertical surfaces, it's essential to use enough sealant to prevent it from sagging before it cures.
After application, ensure to maintain pressure on the materials being bonded until the sealant sets;
this will help achieve a stronger bond.
Always refer to the manufacturer's instructions for the specific curing times and conditions to ensure optimal results.
Common Applications and Use Cases for Liquid Sealant Nail
Liquid sealant nails are versatile tools designed for a range of applications in construction and home improvement projects. One of the most common uses for liquid sealant nails is in the sealing of gaps and joints around windows and doors. This prevents air leaks, enhancing energy efficiency and comfort within a space. Additionally, they are effective for waterproofing areas susceptible to moisture, such as bathrooms and kitchens, where traditional nails might allow water intrusion and damage.
Another popular application of liquid sealant nails is in roofing and siding installations. They provide a strong, weather-resistant bond that helps to protect against the elements, ensuring a durable finish. Liquid sealant nails are also ideal for securing trim and molding, as they offer a clean finish without visible fasteners. Their flexibility allows for application on various materials, including wood, metal, and plastic, making them an essential option for both professional contractors and DIY enthusiasts seeking reliable and innovative solutions in their projects.